Table of Contents
Learning how to bleed brakes is a very essential skill any car owner or a DIY mechanic should master. Brake fluid retains moisture over time and air bubbles may get into the brake lines resulting in a spongy feel on the pedal and less stopping power. Knowing how to bleed car brakes at home will save you a couple of hundreds of dollars in labour charges and still have a safe vehicle on the road. This guide helps you to go through everything you need to know from what type of tools are required and exact steps involved in bleeding brakes.
Why You Must Learn How to Bleed Brakes
Brake fluid is also hygroscopic, i.e. it absorbs moisture due to the presence of air. With increase of moisture the boiling point of the fluid decreases instantly. During heavy braking the brake fluid boils, creating vapor and that is compressible, unlike liquids causing your brake pedal to feel soft. This poses a serious safety threat. The most frequent causes of you having to bleed car brakes are:
- Air made it into the brake lines when it was being repaired or a component was being replaced.
- Brake pedal is spongy or overly firm.
- You have just changed calipers, wheel cylinders, master cylinder, or brake lines.
- It has been more than two years since your last brake fluid flush.
Tools and Materials Needed for Bleeding Brakes
Prior to the learning process of bleeding car brakes, have the following items:
- Fresh DOT 3, DOT 4 or DOT 5.1 brake fluid (see your owner’s manual).
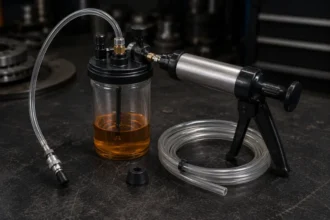
- A bleeding kit of brakes or clear plastic tubing and collection jar.
- A wrench (most often 8mm or 10mm) to unscrew bleeder screws.
- A fluid transfer pump or turkey baster to drain the old fluid in the reservoir.
- Wipe off rags and nitrile gloves.
- A helper (in the case of two-person method) or vacuum bleeder pump.
- Jack and floor jack stands (when lifting the vehicle).
Should You Bleed Brakes with Car On or Off?
Make sure you always bleed brakes when the car is off because it will avoid aerating fluid, will have a better control of pressure, and will be overall safer. Power-assisted braking may complicate the detection of air in the lines when the engine is running and may even be dangerous to draw air back into the system. Leaving the engine off will also prevent unnecessary or irregular pressure and minimize the risk of accidental vehicle movement particularly in cases where the car is on stands.
The simplest way is to get an assistant to pump the brake pedal 3-5 times and then keep it open as the bleeder valve is opened to expel air and fluid. It is preferable to use the right order and begin with the wheel that is most distant to the master cylinder and then move to the nearest, which is the driver front. However, there are exceptions, as some vehicles with certain ABS systems may require the engine to be on or a diagnostic tool to cycle the pump, so it’s always important to consult the owner’s manual for specific instructions.
Bleed Brakes: Car On vs. Car Off
| Condition | Car ON (Engine Running) | Car OFF (Recommended) |
| Brake Booster | Active — can interfere with pressure | Inactive — stable pressure |
| Master Cylinder | Variable behaviour | Consistent and predictable |
| ABS System | May activate unexpectedly | Off (safe for standard bleeding) |
| Recommended For | ABS module cycling only (ignition on) | All standard brake bleeding |
| Safety | Moderate risk of over-pressure | Safest option |
How Long Does It Take to Bleed Brakes?
Well, the answer depends on the method used, your experience level, and whether you are doing a full flush or simply purging air. As a general guide:
| Bleeding Method | Estimated Time | Skill Level |
| Two-Person Method | 30–60 minutes | Beginner |
| Vacuum Bleeding | 20–45 minutes | Beginner–Intermediate |
| Pressure Bleeding | 15–30 minutes | Intermediate |
| Gravity Bleeding | 45–90 minutes | Beginner |
| Full Brake Flush (All 4 Wheels) | 60–90 minutes | Intermediate |
How to Bleed Car Brakes: Step by Step
These are the steps to follow to know how to bleed brakes safely and efficiently. Always ensure that one is working in a well-ventilated place and that the old brake fluid is efficiently disposed to since it is an environmental poison.
Step 1: Prepare Your Car
Park on a flat, level place. Put the parking brake on and loosen the wheel lug nuts a little before jacking the car. Place jack stands under the car – do not work under a car that is upheld solely on a floor jack. Take off the wheels so as to open the brake calipers.
Step 2: Inspection and Fill-up of the Brake Fluid Reservoir
Find the brake fluid reservoir (it is usually a translucent white plastic container that is located approximately at the firewall on the driver side). Take out the cap and fill it with the right kind of brake fluid. Maintain it full during the process to prevent the addition of more air in the system.
Step 3: Find the Bleeder Screws
To each brake caliper or wheel cylinder is connected a bleeder screw (also known as a bleeder valve) – a small nipple-shaped fitting at the top of the caliper. These are normally 8mm or 10mm. When they are corroded spray them with penetrating oil.
Step 4: Bleed in the Right Order
Always bleed the brakes starting from the wheel that is farthest from the master cylinder and then proceed nearer. In the majority of cars, the normal order is:
- Right rear wheel
- Left rear wheel
- Right front wheel
- Left front wheel
Other manufacturers indicate another order – check your service manual of the vehicle to confirm.
Step 5: Add the Bleed Tube and Open the Valve
Set one end of a clear plastic tube to the bleeder screw nipple and dunk the other end into a jar with a small quantity of fresh brake fluid. Your helper may press the brake pedal to the floor and hold it. Open the bleeder screw with your wrench 1/4th to 1/2 turn. The fluid (and perhaps air bubbles) will be flowing into the tube. Once the flow is stopped, close the bleeder screw, and then your helper will lift off the pedal. Continue until all the air bubbles are removed from the fluid.
Step 6: Check the Reservoir
Check and top up brake fluid reservoir after every two or three pumps. Running it dry will allow air to get into the master cylinder and reverse all your effort – a deadly error when learning to bleed car brakes.
Step 7: Brake Pedal Test
After bleeding all four corners, reattach the wheels, take the vehicle down, and stomp on the brake pedal a few times. It must be solid and not spongy. In case the pedal remains tender, repeat the bleeding process. In case the problem continues, then it is possible that there is a more serious problem like a faulty master cylinder.
Understanding Brake System Maintenance in Context
Learning how to bleed brakes is part of comprehensive brake system care that keeps your vehicle safe. Similar to how recognizing signs of a blown motor prevents catastrophic engine failure, identifying spongy brake pedals early prevents brake system failure. Just as the Honda brake pedal recall demonstrated the critical importance of proper brake function, regular brake maintenance including fluid bleeding ensures optimal stopping power. When brake components require replacement, quality aftermarket suppliers like Tagore Auto Parts provide reliable brake parts, remanufactured engines, and transmissions to keep your vehicle safe and operational at reasonable prices.
Conclusion
Knowing how to bleed brakes is a skill directly affecting the safety of vehicles. You could be a professional DIY mechanic or this could be your first time, but regardless, proper procedure would guarantee your brake system is at its optimal performance. Since you know that you should bleed brakes when the car is not running, to knowing how many minutes it will take you to bleed brakes using the method that you have selected, this guide will have it all to do the job properly. Properly maintained brakes, such as periodically bleeding brakes, will help your brake parts last longer, your brakes stop better, and you and all other road users will remain safe.
Frequently Asked Questions
Should I get my brakes bled frequently or not?
The majority of manufacturers suggest that brakes be bled after every 2 years or when brake fluid looks dark and dirty. When you notice a spongy pedal, do it early.
Am I able to bleed brakes on my own without an assistant?
Yes. A one-person vacuum bleeder kit, or a pressure bleeder, will enable you to bleed car brakes on your own. These are very accessible and comparatively cheap tools.
What is the time duration to bleed my brakes with ABS?
For vehicles with ABS, how long it takes to bleed brakes may be slightly longer up to 90 minutes since the ABS modulator may also need to be purged. In other instances, a scan tool is required to operate the ABS pump.
What will happen if I use the wrong kind of brake fluid?
This may cause damage to seals and rubber parts in the system that use incompatible brake fluid. Always apply the type that is indicated in your owner’s manual, which is usually DOT 3, DOT 4 or DOT 5.1.
Is brake fluid hazardous?
Brake fluid is poisonous and may harm the car paint. Wear gloves, do not touch the skin and clean up spills as soon as possible with water. Dispose old fluid at a recycling facility or an automotive waste facility.