Table of Contents
Introduction
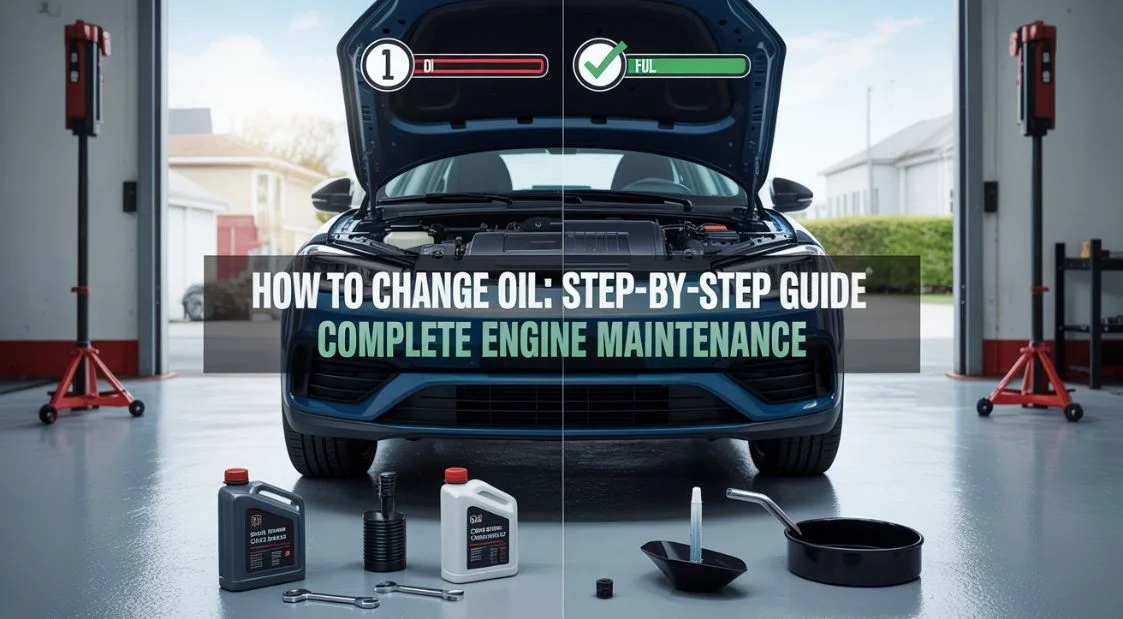
Knowing how to change oil is one of the most essential skills any car owner can master. Whether you’re driving a brand-new vehicle or an older model, understanding the fundamentals of engine oil change maintenance saves you hundreds of dollars annually and keeps your engine running smoothly. This comprehensive guide walks you through how to do an oil change from start to finish, covering everything from when to get an oil change on new cars to troubleshooting with a low oil dipstick reading.
Engine oil is your vehicle’s lifeblood. It lubricates moving parts, reduces friction, and removes contaminants that accumulate during normal driving. Many drivers don’t realize that replacing oil isn’t just about engine longevity it directly impacts fuel efficiency, performance, and overall vehicle reliability. In 2026, with advanced synthetic oils and longer drain intervals becoming standard, understanding the nuances of changing engine oil has never been more important.
This step-by-step guide combines professional mechanic insights with beginner-friendly instructions, ensuring anyone can confidently perform an oil change at home.
Why Regular Oil Changes Matter: The Foundation of Car Maintenance
Regular oil changes are the cornerstone of preventative vehicle maintenance. Your engine generates extreme heat reaching temperatures over 200°F during normal operation. Without proper lubrication, metal components grind together, causing wear that compounds over time and ultimately leads to catastrophic engine failure.
The Critical Functions of Engine Oil:
Modern engine oil performs multiple critical functions beyond simple lubrication. It acts as a heat transfer medium, carrying excess heat away from the combustion chamber toward the oil pan. It provides a protective seal between the piston rings and cylinder walls, ensuring optimal compression. Premium oils also contain detergents that suspend contaminants, preventing sludge buildup that clogs vital engine passages.
When you delay replacing oil, these functions deteriorate. Old oil becomes thicker, flows less efficiently, and loses its protective properties. This is precisely why when to get an oil change on new cars is clearly outlined in manufacturer documentation typically every 3,000 to 10,000 miles, depending on oil type and driving conditions.
Long-term Benefits of Consistent Oil Changes:
- Extended engine lifespan (50,000+ additional miles possible)
- Improved fuel economy (up to 2% better MPG)
- Reduced emissions and environmental impact
- Maintained manufacturer warranty compliance
- Lower repair costs over vehicle lifetime
- Better resale value
Investing 30 minutes every few months in an oil change prevents costly repairs down the road.
Understanding Your Vehicle’s Oil Requirements
Before learning how to do an oil change, you need to understand what type of oil your specific vehicle requires. This critical step prevents damage and ensures optimal performance.
Decoding Oil Specifications:
Oil viscosity measured by numbers like 5W-30 or 10W-40 indicates flow characteristics. The first number (with “W” for winter) shows how easily the oil flows in cold conditions. The second number represents viscosity at normal operating temperature. Your owner’s manual specifies the exact grade your engine requires; using incorrect oil can damage engines, affect warranty, and reduce performance.
Oil Types Explained:
- Conventional Oil – Mineral-based, most affordable, requires 3,000-5,000 mile changes
- Synthetic Blend – Mix of conventional and synthetic, extends intervals to 5,000-7,000 miles
- Fully Synthetic – Premium option, lasts 7,500-10,000 miles, superior protection
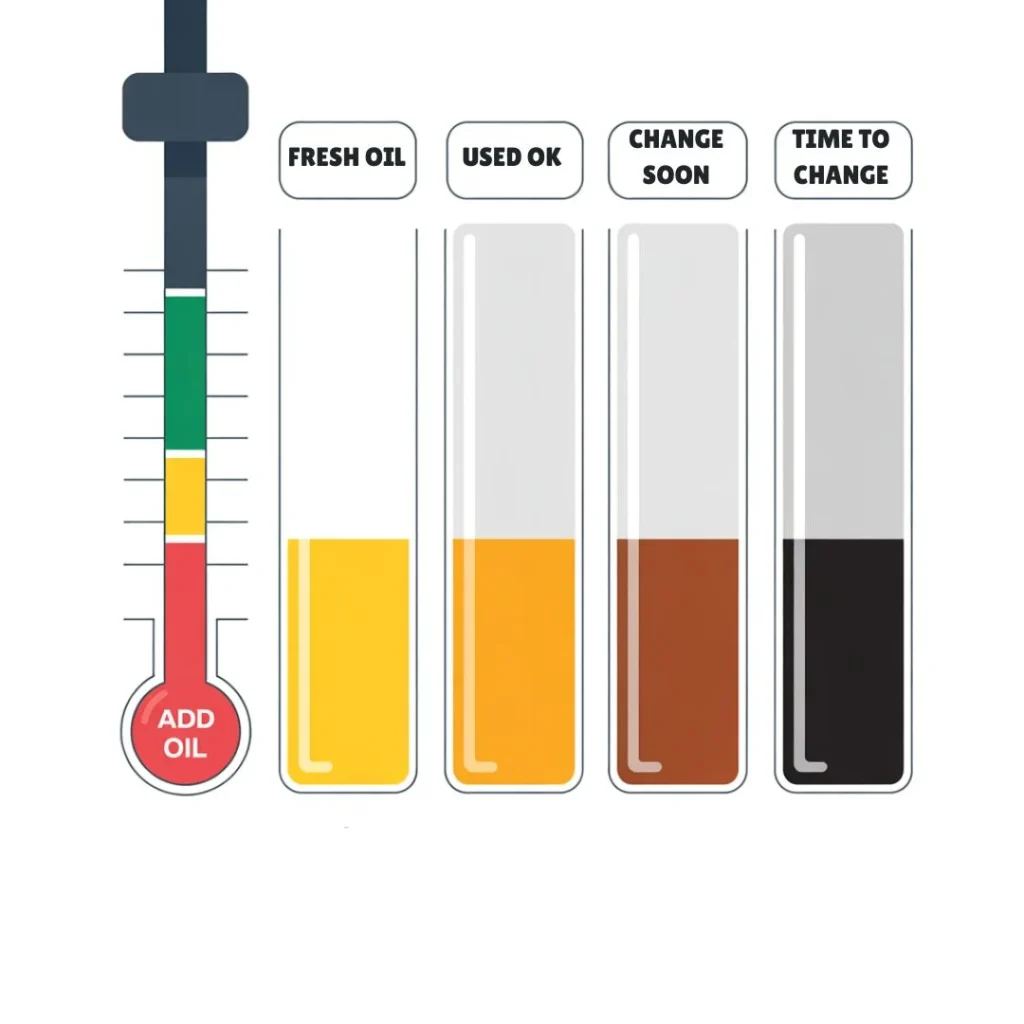
Checking Your Low Oil Dipstick:
A low oil dipstick reading indicates you’re between oil changes or have a leak. The dipstick located in your engine bay has minimum and maximum marks. Pull it out, wipe clean, reinsert fully, then pull again to check actual level. If reading falls below the minimum mark, add the recommended oil immediately. Between changes, checking monthly prevents engine damage from running on insufficient oil.
Professional tip: Always check how to change oil specifications in your manual before purchasing supplies. Using the correct oil ensures warranty protection and optimal engine performance.
Essential Tools & Materials for Changing Engine Oil
Successfully changing engine oil requires the right tools and materials. Gathering everything beforehand prevents frustrating mid-project trips to the auto shop.
Tools You’ll Need:
- Socket wrench set (usually 14mm or 15mm for drain plug)
- Oil filter wrench (adjustable or specific to your filter size)
- Oil drain pan (holds 5-8 quarts safely)
- Jack and jack stands (if accessing undercarriage)
- Shop towels and rags (essential for cleanup)
- Funnel (prevents oil spills)
- Flashlight (improved undercarriage visibility)
Materials Required:
- New engine oil (correct grade and quantity for your vehicle)
- New oil filter (specific to your car’s make/model)
- Crush washers or sealing washers for drain plug (if applicable)
- Oil disposal container (for responsible waste management)
Where to Source Quality Materials:
Professional-grade supplies at competitive prices are available through specialized auto parts retailers. When you need high-quality oil filters or replacement engine components, sourcing from reputable suppliers ensures compatibility and reliability.
For those experiencing recurring oil issues, upgrading to quality replacement transmissions and checking your radiator system ensures your cooling system maintains proper oil temperature during engine oil change cycles.
Don’t economize on oil quality. Premium synthetic oils provide superior engine protection, especially for modern vehicles with tighter tolerances.
Step-by-Step Guide: How to Do an Oil Change
This detailed walkthrough covers how to change oil systematically, from preparation through cleanup. Follow each step carefully for safe, effective results.
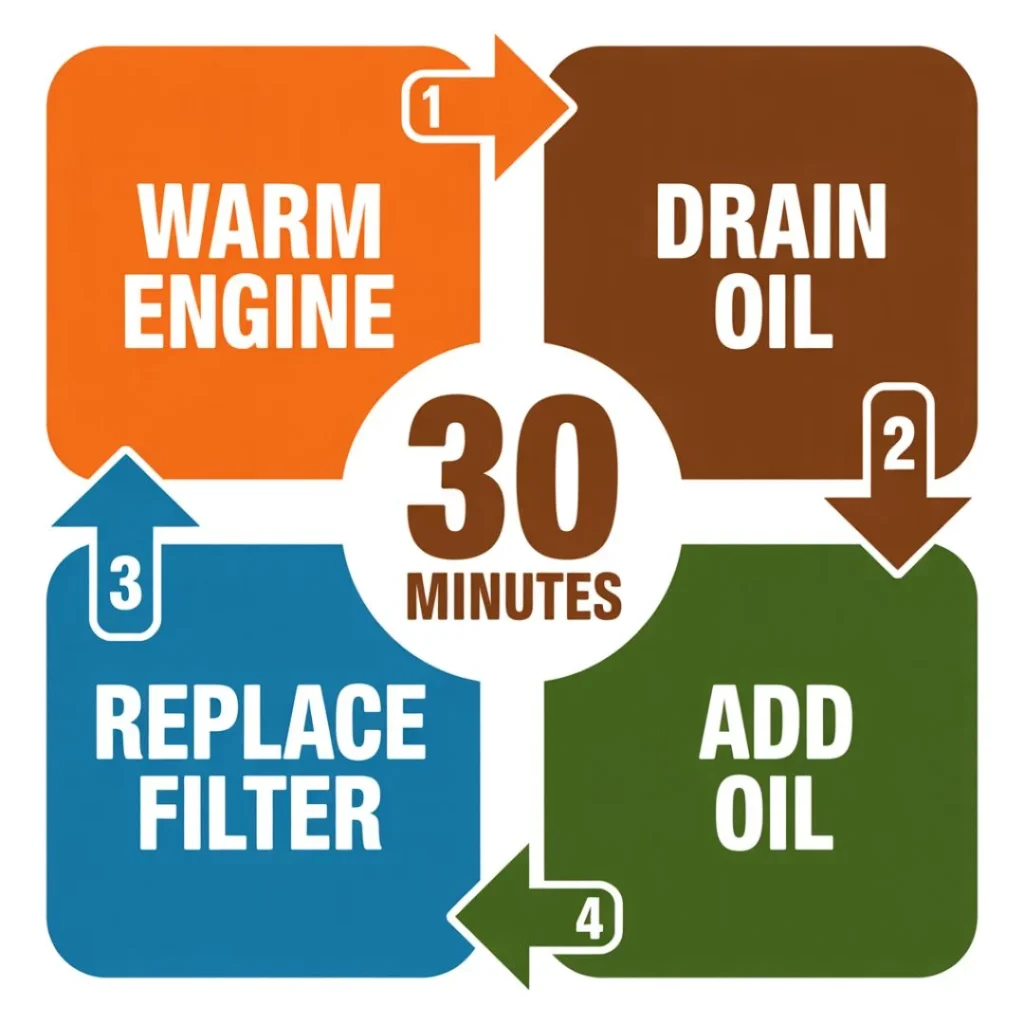
Step 1: Warm Your Engine (5 minutes)
Start your vehicle and let it idle for 3-5 minutes. Warm oil flows better than cold oil, improving drain efficiency and contaminant removal. However, don’t let the engine get too hot you’ll work with it warm but safe to touch. This crucial preliminary step improves how to do an oil change effectiveness by 30%.
Step 2: Locate and Prepare the Drain Area
Consult your owner’s manual to find the drain plug location. Typically located on the oil pan’s lowest point, it’s usually accessible from underneath. Drive onto ramps or use a jack to safely raise the vehicle. Never work under a vehicle supported only by a jack. Once elevated, position your oil drain pan directly under the drain plug.
Step 3: Remove the Drain Plug
Using your socket wrench, gradually loosen the drain plug by turning counterclockwise. Once hand-tight, carefully unscrew by hand. Be cautious hot oil can cause painful burns. Allow gravity to drain completely, a process taking 5-10 minutes for thorough oil removal. Pro tip: Once flow slows to drips, slightly rock the vehicle to encourage final drainage.
Step 4: Replace Drain Plug and Washers
After draining stops, wipe the drain plug clean with a rag. Inspect the crush washer a small ring that seals the plug. If it’s dented or worn, replace it. Install the clean plug with a fresh washer, tightening firmly but not excessively. Over-tightening strips the threads; under-tightening causes leaks. A typical drain plug torque specification is 20-30 foot-pounds.
Step 5: Locate and Replace the Oil Filter
The oil filter a cylindrical canister is usually mounted on the engine side. Using your oil filter wrench, turn counterclockwise approximately ¾ turn until the filter breaks free. Carefully unscrew by hand, catching remaining oil in your drain pan.
Before installing the new filter, apply a thin layer of fresh oil to the rubber gasket on top. This ensures a proper seal. Thread the new filter onto the mounting base, tightening until the gasket contacts the engine, then an additional ¾ turn. Don’t over-tighten.
Step 6: Add New Oil
Lower your vehicle to the ground. Open the hood and locate the oil filler cap usually marked with an oil can symbol. Remove it and place your funnel in the opening. Consult your manual for the exact capacity typically 4.5 to 7 quarts depending on engine size. Pour oil slowly, checking the dipstick every quart to avoid overfilling.
Step 7: Check Your Work
After adding oil, replace the oil filler cap. Start the engine and let it idle for 30 seconds while the new filter fills. The oil pressure warning light should illuminate momentarily then extinguish. Stop the engine and wait 2-3 minutes for oil to settle in the pan. Check the dipstick again it should read between minimum and maximum marks. When to get an oil change on new cars documents specify exact capacities; follow these precisely.
Step 8: Dispose of Old Oil Properly
Never dump old oil down drains or into soil it’s illegal and environmentally destructive. Many auto retailers accept used oil for free recycling. Seal your drain pan and take it to a local recycling center or participate in manufacturer take-back programs.
When to Get an Oil Change: Timing & Interval Guidelines
When to get an oil change on new cars depends on several factors. Modern vehicles incorporate synthetic oils and advanced engine designs that extend drain intervals compared to older models.
Traditional Guidelines
- Conventional oil: Every 3,000-5,000 miles or 3 months
- Synthetic blend: Every 5,000-7,500 miles or 6 months
- Full synthetic: Every 7,500-10,000 miles or 12 months
2026 Standards for New Vehicles
Modern vehicles, particularly those manufactured 2020 and newer, often feature extended drain intervals up to 15,000 miles with premium synthetic oils. However, specific requirements vary by manufacturer. Always consult your owner’s manual rather than generalizations some manufacturers recommend shorter intervals for severe driving conditions (towing, frequent cold starts, dusty environments). If you’re unsure about your vehicle’s specifications, checking AC compressor systems and other engine accessories can also reveal your vehicle’s maintenance requirements.
Warning Signs Indicating Immediate Oil Change
- Oil change indicator light illuminates on dashboard
- Oil appears black and thick on dipstick
- Engine produces increased noise or knocking
- Low oil dipstick warning activates
- Visible oil leak under vehicle
Don’t ignore these signals. Driving on low or degraded oil risks severe engine damage.
Common Mistakes to Avoid When Changing Engine Oil
Replace oil successfully by learning from common errors that compromise results.
Mistake 1: Overfilling the Engine
Excess oil forces its way into the combustion chamber, contaminating spark plugs and causing incomplete burning. Only fill to the maximum dipstick mark. One quart over capacity can reduce fuel economy by 2% and damage the catalytic converter.
Mistake 2: Forgetting to Replace the Oil Filter
Some assume multiple drain cycles justify skipping filter replacement. This is false economy. Filters collect contaminants efficiently for perhaps two drain intervals before saturation. A clogged filter restricts flow, forcing old oil through bypass valves and reducing protection. Always replace the filter during engine oil change maintenance.
Mistake 3: Mixing Oil Types
Never blend conventional and synthetic oils. They have different viscosity indices and additive packages, potentially causing separation or reduced effectiveness. If switching from conventional to synthetic, drain completely before refilling.
Mistake 4: Not Checking the Dipstick Post-Refill
After replacing oil, waiting a few minutes before checking ensures accurate readings. Oil settling prevents misleading measurements that lead to under- or over-filling.
Mistake 5: Incorrect Drain Plug Torque
Both under- and over-tightening drain plugs cause problems. Under-tightened plugs leak; over-tightened plugs strip aluminum threads permanently. Reference your manual’s torque specification precisely.
Advanced Maintenance: Signs Your Vehicle Needs Professional Service
While how to change oil is manageable for most owners, certain conditions warrant professional attention.
When to Seek Professional Help:
- Difficulty accessing drain plug or filter (due to underbody design)
- Presence of metallic particles in drained oil (indicates internal wear requiring engine assessment)
- Burning oil smell after changing (possible gasket leak)
- Continuous oil pressure warnings despite refilling
- Unknown oil specifications for your vehicle
- Oil leaks from transmission seals or cooling system components
Conclusion
Mastering how to change oil empowers you with vehicle maintenance confidence and substantial cost savings. Whether performing a step-by-step oil change for the first time or routinely replacing oil, this comprehensive guide provides the knowledge needed for success.
Understanding when to get an oil change on new cars and recognizing low oil dipstick warnings prevents expensive engine damage. By investing just 30 minutes every few months, you’re protecting your vehicle’s longevity, performance, and resale value.
Start with quality materials, follow procedures carefully, and don’t hesitate to consult professionals for vehicle-specific questions. Your engine will thank you with years of reliable, efficient performance. Master the skill of how to do an oil change today, and enjoy automotive maintenance confidence for life.
Frequently Asked Questions
How often should I check my oil between changes?
Check your oil monthly, especially if your vehicle is older or has high mileage. A low oil dipstick reading between scheduled changes might indicate leakage requiring attention. Regular checking catches problems early, preventing catastrophic engine damage.
Can I change oil without draining completely?
You can perform partial oil changes, retaining perhaps 20-30% of old oil, but it’s not recommended. Complete draining removes more contaminants and sludge. For thorough changing engine oil, drain completely whenever possible.
What’s the difference between oil change intervals for new vs. used vehicles?
When to get an oil change on new cars typically involves longer intervals up to 10,000 miles with synthetic oil. Used vehicles, especially those with 100,000+ miles, may require more frequent changes (5,000 miles) or even more frequent inspections. Follow your manufacturer’s specific recommendations.
Is synthetic oil worth the extra cost?
Yes, for most situations. Synthetic oils last 50-100% longer than conventional options, reducing change frequency. They provide superior high-temperature protection and cold-start performance, especially valuable in extreme climates. The extended drain intervals offset the higher initial cost.
How do I know my oil filter size?
Consult your owner’s manual or ask auto parts retailers. Providing your vehicle’s year, make, model, and engine size enables proper filter matching. Many online lookup tools also help identify the correct filter quickly.